
Step By Step


I'm going to start doing a few step by step walk throughs of how I create my projects.  For the first one I'm going to show you how I create a background for a scrapbook layout.


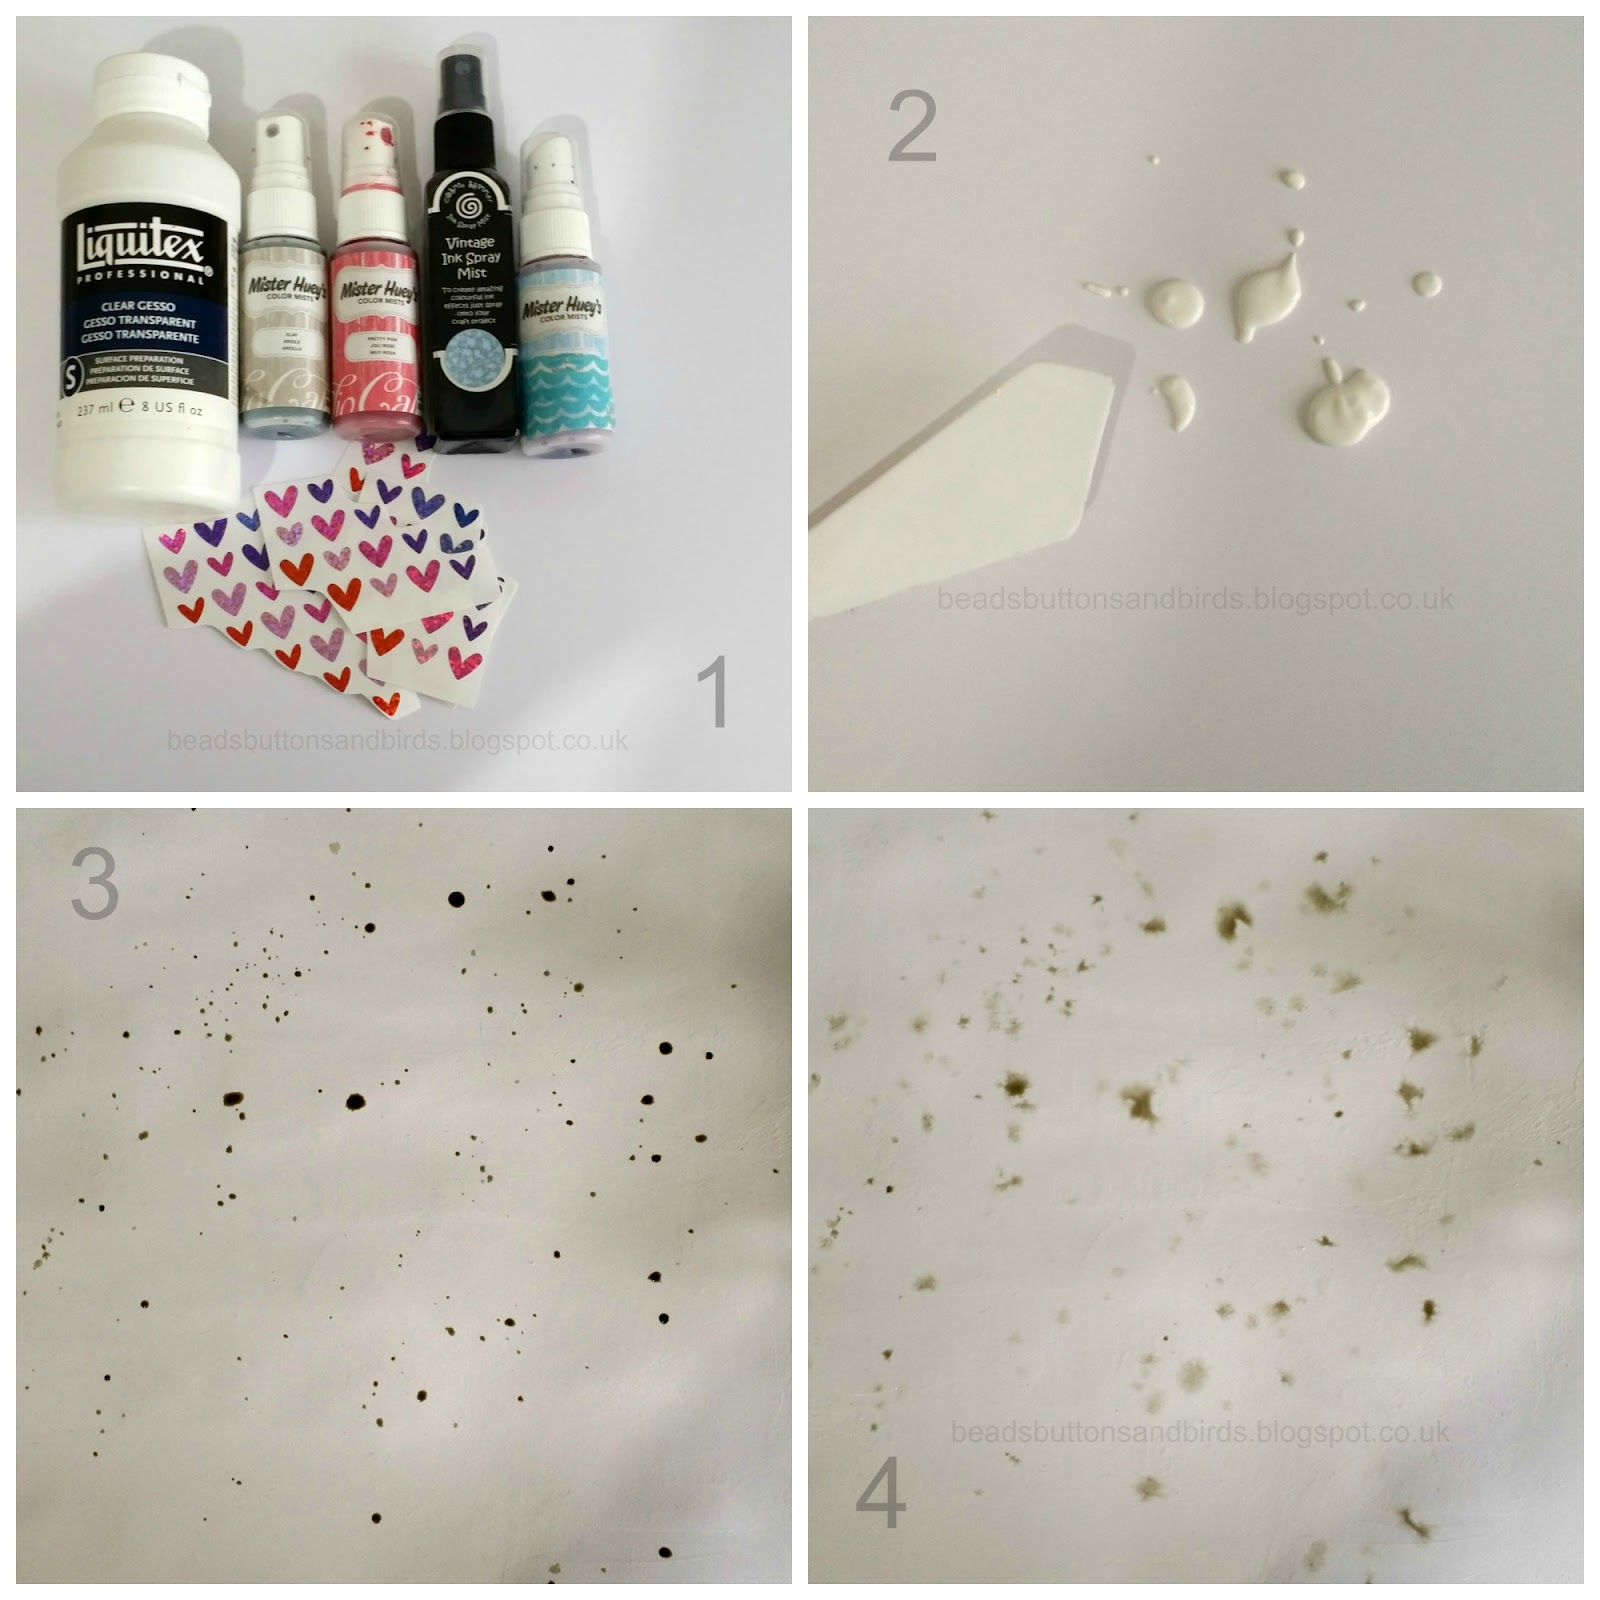
1. I started off knowing I want to use some holographic heart stickers.  They are pinks, purples and blues and these prompt me with the colours of inks I want to use.  I also add a neutral grey and my trusty clear gesso.

2. I know I am going to be using water and that my card is regular thick card - it will warp.  You could use watercolour paper if you wish.  To help combat the warp I spread the thinnest layer of clear gesso over my card.  I use a pallet knife to spread it as thin as possible - you really don't need much.

3. When the gesso is dry I start flicking my mists.  I tend to start with the neutral colour.

4. I spritz the ink droplets with some water to spread the colour and give a more painterly look.


5. I then took my lilac mist and blue mist and flicked on some colour.  As I had already spritzed with water I didn't need to add more, but if the inks stop flowing and merging on the paper you can spritz with water again.

6. My pink mist is quite bold so I put a few drops in a pipette with some water to dilute the ink so it doesn't stand out too much from the other colours.  (I find pink and red splatters can look a little blood like, so I try to avoid this!)

7. I flicked the diluted ink direct from the pipette and it gave me bigger blobs.  I didn't mind the size of the blobs but I did feel they were a little bit too bright.

8. To soften the pink I rolled some kitchen paper over the top to absorb the excess ink.


9. Repeat steps 3-8 adding another 4 layers of inks splats, again spritzing with water to get the inks to flow across the page.

10. When the last layers are completely dry I added some flicks of the neutral ink without spritzing with water.  These ink drops stay as defined drops instead of spreading out.

11. Add stickers as randomly as possible, keeping an eye on the balance.  You don't want too many pinks on one side, try to spread them evenly.  Also, keep a few stickers spare for using as finishing touches on your finished layout.

So that is my process of making a background.  Come back tomorrow to see the finished layout...

Let me know what you think, and ask any questions you may have - I love to hear from you!  Thanks for stopping by!

Comments

  1. Thanks for the step by step. Looking forward to seeing the LO. Sue

    ReplyDelete
  2. This looks so pretty Laura, look forward to seeing the finished layout tomorrow. xx

    ReplyDelete

Post a Comment

Thank you for taking the time to comment.
I love to read your messages...

Popular posts from this blog

Hoppity!

Hoppity hoppity!!  :) Hopeful you have arrived here from Fleur 's blog as part of the Crafty Ribbons Easter Hop .  If not and you've found yourself here wondering what on earth I'm on about (and let’s face it J you wouldn’t be the first!!) check out the Inspirations site for all the juicy details! My project for the hop is         Easter bunting!  I cut three templates first - a triangle pennant, a bird and a heart.        Then I cut the pennant shapes from fibre ribbon, threaded them on to some 3mm satin and evenly spaced them.  I embellished each flag with some beads...       I backed the birds and heart on some thin white card and glued them to the centre of the pennants.   My supplies list: yellow fibre , pink fibre , lime fibre , 3mm satin , button box , white card, glue, beads, needle and thread.   At each stop on the hop there'll be a word to collect and a candy draw. I've got these

WOYWW 159

Hello, Happy Whats On Your Workdesk Wednesday !  As promised a picture of last Wednesdays 'work' finished off.  Post and more photos here . This week I'm showing off the beaded ATC I made... Tricky to photograph so your getting one with flash and one without... It was all parcelled up and sent off to Queen of Desks Julia .  Here is a basic of how it was made... (lots of waffle about wefts and warps!) I use a flexible beading needle.  It is mainly 'eye' so it is very easy to thread. And delica beads which are more regular and accurate than the better known seed bead.  They are slightly more rectangular than round so they line up better. Thread your needle with the weft thread.  (The cross ways thread that weaves back and forth.)  Pick up the beads... Pass the needlefull of beads underneath the warp (tight length ways) threads on the loom... ...and push each bead up in the corresponding g

DMIO: Teach Me Something

A few weeks back I made a dream catcher.  A few readers asked if I could show them how I made it, so, here is my attempt at a tutorial! First up weaving the web. 1. You'll need a hoop and some ribbon/thread/yarn on a bobbin. 2. Attach the ribbon securely to your hoop. 3. Take your ribbon over the top of the hoop... 4. and up through the loop you've just made with the ribbon... 5. so you have a cross over. 6. Continue steps 3-5 until you reach the knot. 7. Now instead of going over the hoop you will crossover the ribbon 8. and through the loop you've just made to give a crossover. Continue on in this fashion until you get to the middle. You need to leave a hole in the middle as this is where the good dreams get through!  They then run down the tassels/feathers/any other hanging decoration and on to the owner.  It should look something like this.  You'll need to play around with your tension until you get a firm web. Now for the tassels - I like to